Showing posts with label Projects. Show all posts

Wednesday, August 3, 2011

DIY: textured, spiced, painted poetry wall art


Recently, I posted this photo of the new art piece in our living room.  I actually decided to take some photos of the process, which is strange for me, because I don’t normally think that way. So, here’s my little contribution to the creative world today.  This is very precise and scientific method.
Nope.
The story goes, I had been dreaming of a large canvas for ages, but never desire to shell out the money for one, I blame diapers.  But, one day my sister brings this one from my mom’s house. My mom is always getting rid of things, and she thinks that I want everything she is purging. I do not.  Canvases are the exception.  VHS tapes are not. 
  IMG_9629IMG_9628
1. Gather old book pages from a book you no longer want, or one you bought for art purposes OR if you just happen to have one that some guy bought you years ago as gift, because he liked you but not enough to really, actually be in a relationship. HA.  Use that.
2. In a dish mix water and a spice that you think would make a cool color.  I used turmeric, because I have it and I don’t really know what to use it for, except for art projects. So add a few tablespoons to the water and stir, stir, stir. 
3. Soak pages in the water for about 30 seconds each and then spread them out to dry.  You’ll have to take them all back up again, so don’t spend much time thinking about placement.  I don’t know how long they take to dry, because it was like an oven in my house this day thanks to the burning fire in the sky.
IMG_9630IMG_9633
4. You could totally skip this step, but I think it adds a fun texture and it’s interesting.
5. NOT PICTURED- Cover the canvas with a layer of modge podge.
6.Arrange pages as you desire, then enlist an artist apprentice for the next step.
7. Mix some brown/yellow water color paint with some water, so it’s really runny and let small child have the best time ever.
8. Take paper towel/ news paper and dab the wet paint in various spots to create an aged/texture look.
9. Let it dry.
10. NOT Pictured-  When dry, apply another layer of modge podge to seal the pages. It’s boring, but the right thing to do.
IMG_9639IMG_9640IMG_9641IMG_9651
11. More drying. more boring.
(At this point, I stopped taking pictures.)

13. Take white paint (or whatever color you desire) and casually paint the canvas, we’re going for the messy look here, which might be hard for some of you, but you really want the words to show through in various parts.
14. Ugh. let. it. dry.
15. Lastly, you can do whatever you want next, paint, chalk, pastels, fabric, strawberries- like Jude in across the universe… ANYTHING.  I chose to write a poem with a sharpie, because this much writing would be hard to do with paint.  I used this poem by e.e. cummings.  It’s always been one of my favorites.  I wrote it very quickly and haphazardly, because I wanted it to look that way.  Imperfection is perfection.
Voila. Textured. Spiced. Painted. Art.

If you ever decide to have so much fun doing anything like this, please let me know. I’d love to see it.

Thursday, July 28, 2011

coming soon…

A collaboration between my favorite husband and I.  We’re pretty excited about it.  For now a sneak peek.

Sunday, July 17, 2011

this is easy as lovers go.

Last night around 10pm, the father of my children and I rearranged the entire living room.  We got rid of the very last piece of furniture that he had from his bachelor days, I think he almost cried, but probably not. Meaning that our entire home is full of things that we have acquired together, in our almost four years of marriage and three moves.  Is that romantic or what? 

All of this happened because that son of ours was getting a new bed, a real live (not really living) twin bed, since we are attempting the merger of our offspring into the same room.  Little did he know that last night was his very last night in his crib turned toddler bed forever! And to think that he won’t even remember. Ha. 

Anyways, I love staying up late and working on things when those children are sleeping, mainly because we can actually accomplish something, but it’s fun to have uninterrupted hours of just us, sans the whole parenthood bit.    Let me tell you, that boy of ours, he’s a heavy duty sleeper, we cleared out and moved two major pieces of furniture from his room, while he was sleeping… he didn’t even flinch.  That girl baby needs to learn a few things about sleep from her brother.  We’d all be happier for it.

And since this merger is starting, I finally get to set up her crib bedding and do lots of fun little projects to make their room equally boy/girl awesome-sauce. 

Here’s a little preview.


P.S. I’m kind of into using song lyrics as my post titles lately, so if you feel confused, don’t.

Sunday, June 12, 2011

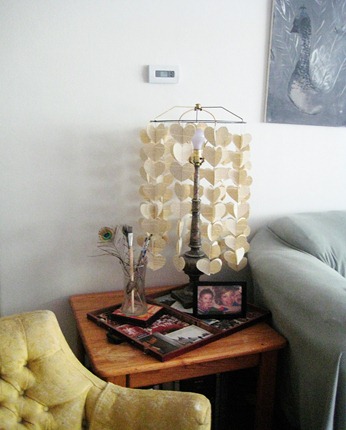
the heart willow tree- lamp restyle

Lamp BaseWe have this lamp, it had the ugliest old shade and the whole little switch part stopped working, so it had to be plugged in/unplugged to be used. The outlet was behind the couch, so, yeah, we never used it.  I’ve always love the base, so it’s been sitting on our end table for ages, bothering me. Recently, I tore up the hideous shade, who even knows what that thing was made out of, it was gross and saved the frame.


I cut hearts out of pages from an old book and sewed strands of two hearts together, eight sets in each strand.  Then I simply tied them to the frame. 

close up

top of lamptop spiralLamp 1 

I love how it softly twirls all day long, like it’s listening to la vie en rose on repeat. It reminds me of a willow tree, which reminds me of my first date with the father of my children, who is my husband. All this makes my heart happy.whole view copy

It would also be a fun mobile for a little girl’s room, using embroidery hoops, with multiple layers inside of each other or alternated. I just imagined a giant chandelier. Someone please make that.

Also, inside-out carrot cake cookies from Trader Joe's are a revelation.

Tuesday, May 3, 2011

petite feet

The other day, I stared at a pair of the baby girl’s boots.  I stared and stared and stared… and then I studied and examined and contemplated and stared some more.  I might have looked silly if anyone saw me, gazing at a baby shoe, but after a while, I stopped the staring and set to work.  On nearly the fifth attempt, I came up with this.

 
I finished another pair this morning. 

Can I be honest?  I am wild about this pair, positively wild. 
Here’s some more honesty.  Baby shoes are no picnic, they are tiny and require meticulous details which are two of my least favorite things, meticulous and details, but I love this new challenge.  Most of all, I love the design aspect, so if you have any extra shoe-making elves around, send them m way.  I pay in coffee and fabric scraps.
I’m not sure if this is going to turn into something more, but I wouldn’t hate that… for now, I’m still working out the how-to aspect and I’ll have to figure out just what to do with my practice pieces.
Maybe I’m crazy, headbands one day, baby shoes the next, paintings, dresses, toys… oh my, but I was made for this creating business and I see no reason to pick just one.  And I know I’m not the only one who would say that in this crafting/designing/creative blogging community.
Now.. about those elves? Do they also babysit? And clean houses?

Friday, April 8, 2011

Cereal Town: Welcome Home

The morning was cool and crisp.  The sun was shining bright. The day had finally come, the one that citizens had been dreaming of… for minutes.  As the baby sister slept and the mama dreamed a morning free of toddlerfititis, Cereal Town was born.  Cereal Town, established 2011.

It started small, as all cities do, but within hours, it became a thriving metropolis.  Naturally, cereal town would never withstand an earthquake, being constructed of cardboard and scotch tape, but in its short life, it has already survived one natural disaster known as the fierce Hudson monster.

Cereal Town is a wonderful little town, with features that you might see wherever you live.

Yet, unlike some places, it prides itself on fiscal responsibility and government officials who actually want to keep it running, rather than run it into the ground. 

It is full of Dr. Seuss like trees and quaint flower gardens.

And much like other cities and animated films, the animals escape from the zoo. 

Cereal town is part city/part car playground, although owning a car here, may cost you a pretty penny.

Unless, you are the right kind of car.

Home of the raisin bran tower, the batman building (a tribute to Nashville), and the world famous l’arc de peanut butter.

Which is short for l’arc de peanut butter wafers.

And that’s Cereal Town, a place that prides itself of the virtues of being green and subtle advertising. 

Cereal Town, fun for all ages.  Welcome home.

Wednesday, February 2, 2011

the reveal

Remember the fabric dilemma for Harper’s bedding?  Remember when I chose the fabric that “delighted my artistic soul?” Remember the sneak peeks?  Remember when I had the cutest baby girl in the world?

Alright, enough remembering.  You want pictures.   Cue pictures.

IMG_6669

{the quilt}

IMG_6683

IMG_6671IMG_6672IMG_6673

IMG_6685

{the whole deal}

IMG_6686

I was fortunate to find some cute models already in their pajamas (or rather still in their pajamas at 11am) hanging around me to show off the finished product…

IMG_6667IMG_6668IMG_6674 - Copy  IMG_6675 - CopyIMG_6677IMG_6679IMG_6680

and then… Harper’s stuffed friends joined in the fun.

IMG_6694IMG_6696IMG_6697

sweet bedding for my little lady.

I should note that technically it is not finished, as I haven’t added the ties to the bumper, I still don’t know what to use, so if you have any ideas please send them my way.   I haven’t closed off the sides of the bumpers, in case I need to pull out the pads to sew on the ties. Once I do this, then it will really be done.  I think I’m opting out of a crib skirt for now, since I don’t store things underneath, but I can always make one later.  Technically, she won’t sleep in this crib for a while, since she’s our roommate for the next six months… and it’s still being used by the original owner as a toddler bed.

Total cost of fabric, quilt batting, bumper pads:  $90

Actual time sewing: less than 10 hours

Biggest challenges: Finalizing the design

Biggest frustration:  Measuring and cutting the strip for bumper.

(I’m not into numbers and measuring)

Worth it or not: Absolutely yes.

So, if you’ve questioned whether or not you should make your own bedding, I’d say yes.  I love that I have just the fabrics and design I wanted. I love that it’s completely one of a kind.  I also love that I made it and spent much less than I would on something generic from the store. 

Sometimes, I start scheming up other designs too… but I’m not sure this is my new creative endeavor, besides, I’m a little busy these days.